You’ve probably had vegetable soup before, but have you tried it with a golden blanket of melted cheese on top? This comfort food favorite transforms basic vegetable soup into something special, using just a few pantry staples and your broiler’s magic touch. Whether you’re craving a cozy dinner or looking to jazz up leftover soup, adding that irresistible cheesy crust might just change how you think about this classic dish forever.
History of Cheese Topped Vegetable Soup
While the exact origins of cheese-topped vegetable soup aren’t precisely documented, this comforting dish emerged in the mid-20th century when home cooks began experimenting with broilers and cheese toppings.
You’ll find its roots in both European gratinée traditions and American casserole culture of the 1950s and 1960s.
As kitchen technology evolved and broilers became standard in home ovens, you’d see more recipes featuring that irresistible melted cheese top.
Women’s magazines of the era frequently published variations of this soup, often suggesting it as a budget-friendly way to use leftover vegetables.
The addition of cheese not only enhanced flavor but also added protein, making it a complete meal that you’d typically find served in diners and family restaurants across America.
The Best Recipe
- 1 pound mixed frozen vegetables
- 4 cups vegetable broth
- 1 large onion, diced
- 1 cup heavy cream
- 2 cups shredded cheddar cheese
- Salt and pepper to taste
In a large pot, heat a tablespoon of oil over medium heat and sauté the diced onion until translucent, about 5 minutes.
Add the frozen vegetables and vegetable broth, bringing the mixture to a boil. Reduce heat and simmer for 15 minutes or until vegetables are tender.
Stir in the heavy cream and simmer for an additional 5 minutes. Season with salt and pepper to taste.
Transfer the soup to oven-safe bowls, top generously with shredded cheese, and broil for 2-3 minutes until the cheese is melted and lightly golden.
For the best results, ensure your broiler is fully preheated before adding the cheese topping.
Watch the soup carefully during broiling as cheese can quickly go from perfectly golden to burnt.
If making ahead, store the soup base separately and add the cheese topping just before serving.
The soup’s consistency can be adjusted by adding more broth or cream to achieve your desired thickness, and make sure to use heat-safe bowls that can withstand broiling temperatures.
Cooking Steps for Cheese Topped Vegetable Soup
You’ll start by dicing your onion finely and heating oil in a large pot until it shimmers.
Next, add your frozen vegetables and broth, letting them simmer together for 15 minutes before stirring in the heavy cream for that perfect creamy texture!
Once your vegetables are tender, transfer the soup to oven-safe bowls and top with a generous layer of cheese before broiling until you’ve got that irresistible golden crust.
step 1. Dice Onion Finely

Start by peeling the large onion and cutting it in half from top to bottom through the root end.
Place each half cut-side down on your cutting board to create a stable base for safe, precise cuts.
Make lengthwise cuts in each onion half, about 1/4 inch apart, but don’t cut all the way through the root end – this helps keep everything together while you’re working.
Next, make horizontal cuts parallel to your board, again keeping the root intact.
Finally, slice across the onion to create uniform, small cubes about 1/4 inch in size.
You’ll want roughly 1 cup of finely diced onion for this recipe.
Don’t worry if your cuts aren’t perfectly even – they’ll cook down nicely in the soup anyway!
Just aim for pieces small enough to fit comfortably on your spoon.
step 2. Heat Oil in Pot
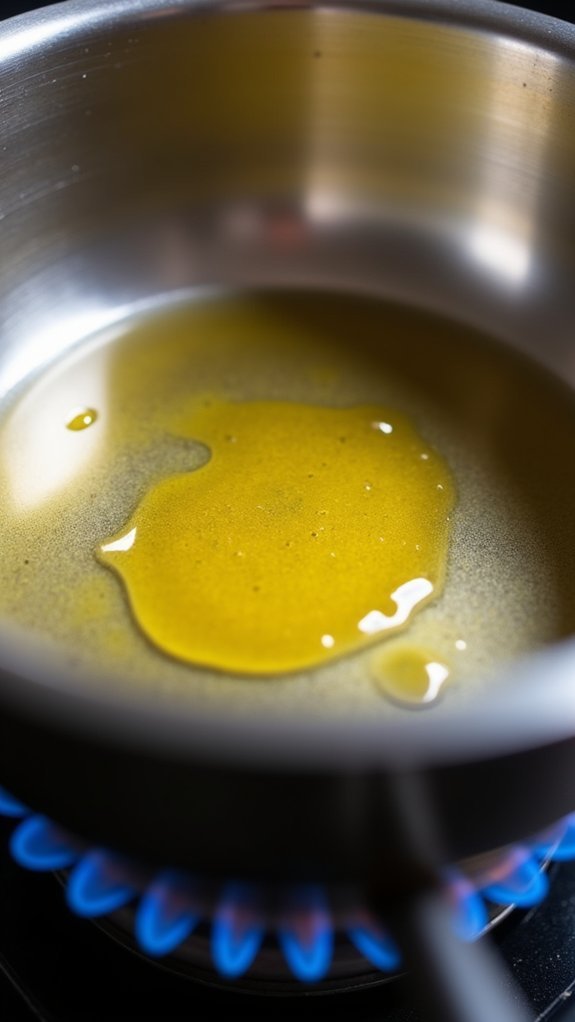
Place a large, heavy-bottomed pot over medium heat and add 2 tablespoons of olive or vegetable oil.
You’ll want to let the oil heat up until it starts to shimmer – this usually takes about 1-2 minutes.
The right temperature is crucial here, so don’t rush! If you’re using an electric stove, set it to level 5 or 6. For gas stoves, keep the flame at medium, where you can see a steady blue ring.
You’ll know the oil’s ready when it easily coats the bottom of the pot and moves like water when you tilt it. If you see smoke, you’ve gone too far – simply remove the pot from heat for a minute and start again.
The perfect oil temperature will ensure your onions sauté properly without burning.
step 3. Add Vegetables and Broth
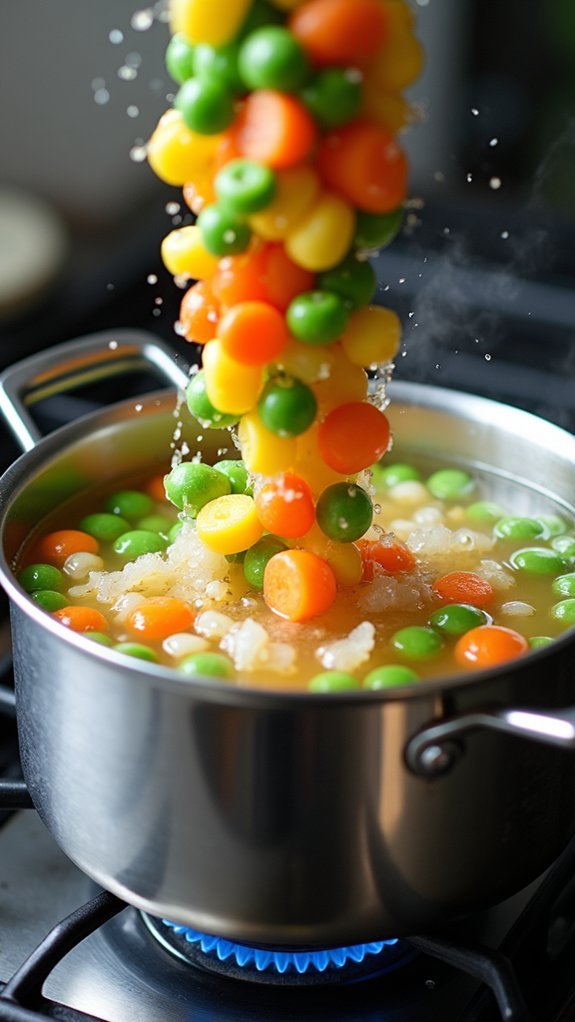
Once your oil has reached the ideal temperature and your pot is ready, gently add the diced onions and sauté them until they become translucent – about 3-4 minutes.
Now it’s time for the main event! Add your pound of frozen mixed vegetables straight to the pot – no need to thaw them first.
Pour in 4 cups of vegetable broth, making sure there’s enough liquid to cover all those colorful veggies. You’ll want to bring this mixture to a gentle boil, which should take about 5-7 minutes.
Once you’ve got that rolling boil, reduce the heat to medium-low and let everything simmer for 15 minutes.
Keep an eye on your vegetables – they’re done when they’re tender but still hold their shape. Give the soup a quick stir occasionally to prevent any vegetables from sticking to the bottom.
step 4. Stir in Heavy Cream

Pour your cup of heavy cream into the simmering vegetable mixture in a slow, steady stream while stirring continuously.
You’ll notice the soup’s color transform into a lovely pale golden hue as you blend the cream in. Keep stirring for about 30 seconds to prevent any separation.
Let the creamy mixture simmer for 5 minutes, maintaining a gentle bubble – you don’t want it to boil aggressively at this point.
The cream will help thicken your soup to that perfect, velvety consistency that’ll make you feel like a pro chef!
Watch for tiny bubbles around the edges of your pot as a visual indicator of the right temperature.
If your soup seems too thick, you can thin it out with a splash of vegetable broth until you reach your desired consistency.
step 5. Add Cheese and Broil

After your soup reaches the perfect creamy consistency, it’s time for the grand finale – the irresistible cheese topping!
Transfer your hot soup into oven-safe bowls, leaving about an inch of space at the top for the cheese layer.
Position your oven rack about 6 inches from the broiler and preheat it on high.
Sprinkle a generous ½ cup of shredded cheddar cheese over each bowl of soup, making sure you’ve got even coverage.
Place your bowls under the broiler and watch them carefully – this part goes quickly!
In just 2-3 minutes, you’ll see the cheese transform into a golden, bubbly blanket.
When you spot those perfect brown spots appearing, you’ll know it’s ready to serve.
Don’t walk away during this step – nobody likes burnt cheese! But we love the great tasting Cheese Topped Vegetable Soup!
Final Thoughts
This hearty cheese-topped vegetable soup delivers comfort and nourishment in every spoonful while keeping preparation simple and straightforward.
You’ll find it’s a perfect go-to recipe when you’re craving something warm and satisfying.
Don’t hesitate to experiment with different cheese varieties – sharp cheddar, Gruyere, or even a blend can create exciting flavor variations.
You’ll want to keep an eye on your portions, as this rich soup can be quite filling.
Store any leftovers in an airtight container for up to three days, but remember to add fresh cheese when reheating.
For the best results, serve your soup immediately while the cheese is still perfectly melted and stretchy.
Once you’ve mastered this basic version, you can customize it with additional herbs or spices to make it your own! Then make sure to come back to this post Cheese Topped Vegetable Soup and give us your upgrades to share with others.