Have you ever had Chocolate Truffles? You’ve probably seen those perfectly round chocolate truffles in fancy candy shops, but did you know you can make them at home? These bite-sized indulgences, named after the rare fungi they resemble, transform simple ingredients into pure chocolate magic. While they might look intimidating, you’ll be surprised to learn that creating your own professional-quality truffles requires just a few key techniques and basic ingredients. Let’s explore how you can master this classic French confection right in your kitchen.
History
While chocolate truffles are now a beloved confection worldwide, they were first created in France during the 1920s when pastry chef Louis Dufour ran out of ideas for Christmas treats.
You’ll find it amusing that these luxurious candies were named after the black truffles (mushrooms) they visually resembled – both having a dark, bumpy exterior.
The original chocolate truffles were made by rolling ganache in cocoa powder, creating that signature earthy appearance.
After their debut in Chambéry, France, they quickly gained popularity throughout Europe.
You’ve probably noticed that modern truffles come in countless variations, but they all stem from Dufour’s creative solution to his Christmas dilemma.
Recipe
Chocolate truffles are decadent confections that capture the essence of luxury in each bite-sized morsel. The combination of rich dark chocolate and smooth heavy cream creates a silky ganache that forms the heart of these classic French delicacies.
While they may look sophisticated, chocolate truffles are surprisingly straightforward to make at home with just a handful of quality ingredients. The process involves creating a smooth chocolate mixture, allowing it to set, and then forming it into small balls that are dusted with cocoa powder for a professional finish.
- 8 ounces dark chocolate, finely chopped
- 1/2 cup heavy cream
- 2 tablespoons unsalted butter
- 1/4 cup unsweetened cocoa powder
- 1 teaspoon vanilla extract
Begin by finely chopping the dark chocolate and placing it in a heat-safe bowl. Heat the heavy cream in a saucepan until it just starts to simmer, then pour it over the chocolate. Let stand for 2 minutes, then stir until smooth. Add the butter and vanilla extract, stirring until fully incorporated.
Refrigerate the mixture for 2 hours or until firm. Once chilled, use a small scoop or spoon to portion the mixture, roll into balls with your hands, and coat each truffle in cocoa powder.
For ideal results, work quickly when rolling the truffles as the heat from your hands will soften the chocolate mixture. If the mixture becomes too soft, return it to the refrigerator for 15 minutes to firm up.
Store the finished truffles in an airtight container in the refrigerator, but serve them at room temperature for the best flavor and texture. The truffles will keep for up to two weeks when properly stored.
Cooking Steps
You’ll want to start by finely chopping your chocolate into tiny pieces before heating the cream to a gentle simmer in a saucepan.
Pour the hot cream over your chocolate and let it stand for 2 minutes, then stir until smooth and add the butter and vanilla.
Once your mixture is chilled and firm (about 2 hours), you’re ready for the fun part – rolling those chocolatey mounds into balls and giving them a luxurious dusting of cocoa powder!
step 1. Chop Chocolate Finely
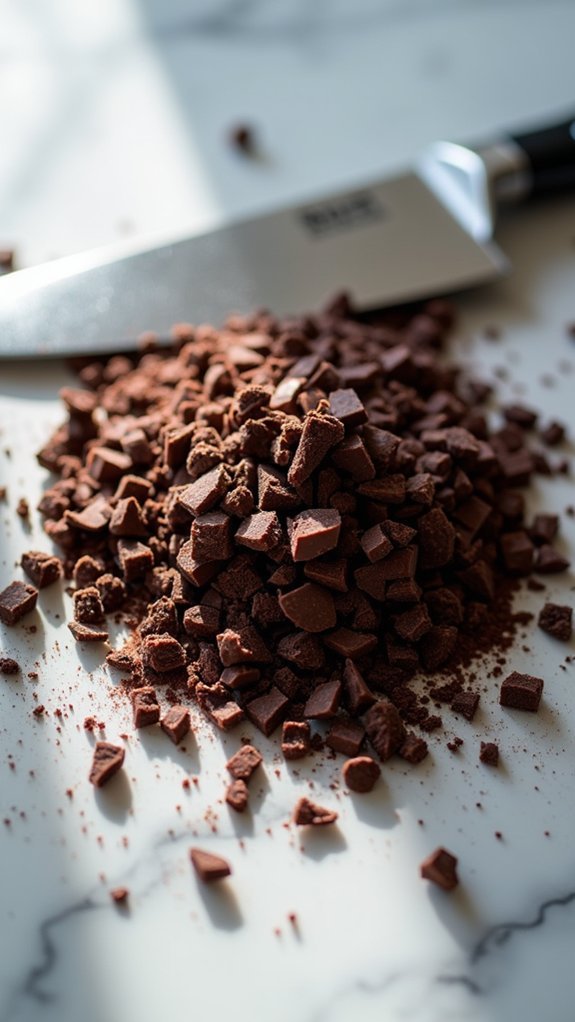
Start by breaking down the 8 ounces of dark chocolate into tiny, uniform pieces using a sharp chef’s knife. You’ll want the pieces to be no larger than a pea – think chocolate confetti!
The smaller and more consistent your chocolate pieces are, the more evenly they’ll melt.
Place your chocolate bar on a cutting board at a slight angle, and use a gentle rocking motion with your knife to create thin shavings. If you’re working with chocolate chips instead of a bar, you’ll still need to chop them into smaller pieces.
Don’t be tempted to skip this step – larger chunks won’t melt properly and could leave you with a grainy texture.
Once you’ve finished chopping, your chocolate should look like fine gravel, ready for the next step.
step 2. Heat Cream Until Simmering
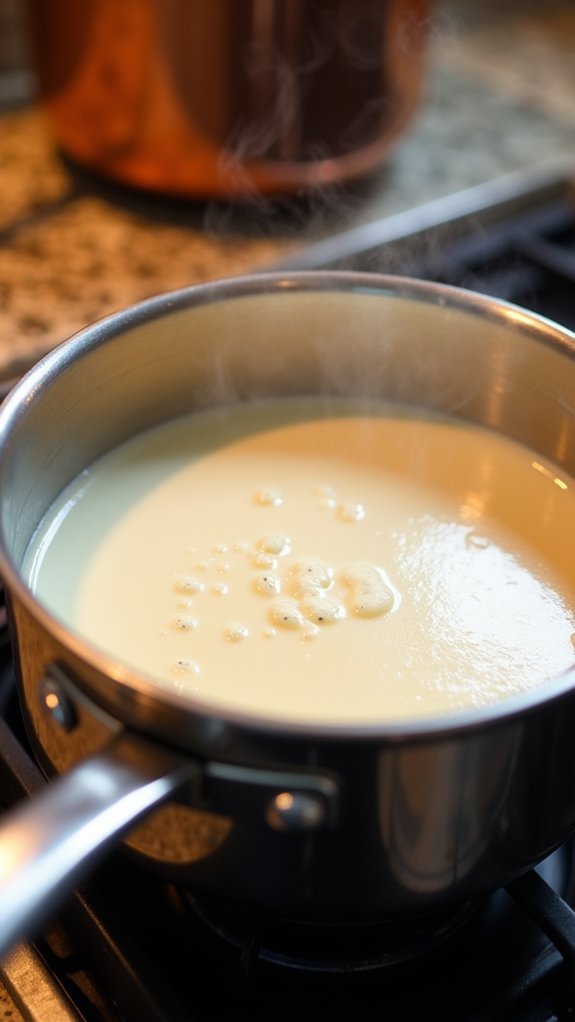
With your finely chopped chocolate waiting in the bowl, it’s time to prepare the cream that will transform those tiny shards into silky ganache.
Pour 1/2 cup of heavy cream into a small saucepan and place it over medium-low heat.
Watch the cream closely as it heats – you’re looking for tiny bubbles to form around the edges of the pan. Don’t let it reach a full boil! The perfect temperature is around 180°F, when you see those first whispers of steam rising from the surface.
If you don’t have a thermometer, no worries – just look for small bubbles and slight movement in the cream.
Once your cream reaches the simmering point, immediately remove it from the heat.
You’re now ready for the magical moment when cream meets chocolate!
step 3. Pour Cream Over Chocolate
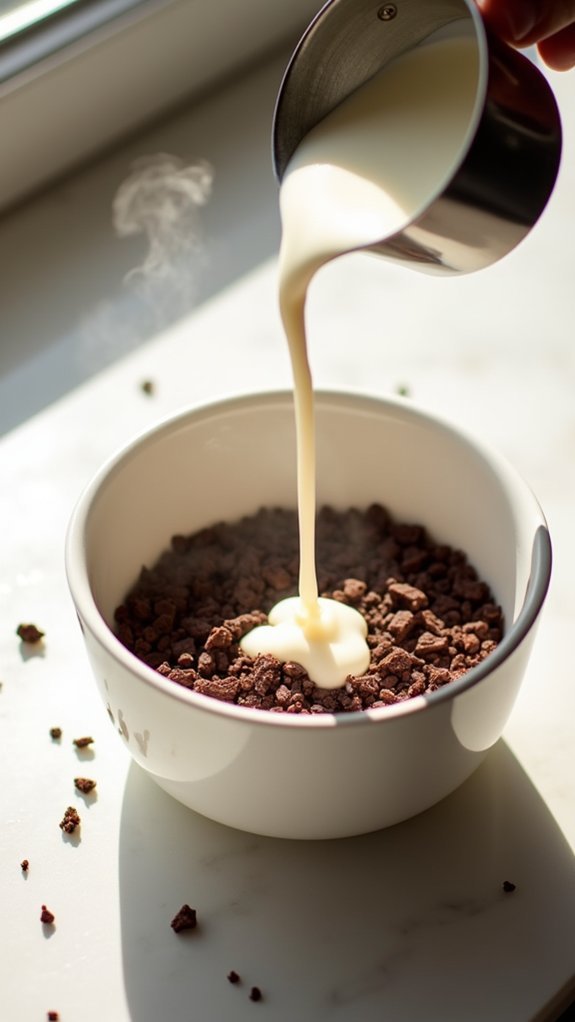
The next essential step requires carefully pouring your hot cream directly over the chopped chocolate in the bowl.
You’ll want to pour slowly and evenly, ensuring all the chocolate pieces are covered by the hot cream. This process kickstarts the melting of your chocolate through gentle heat transfer.
Don’t stir the mixture just yet – patience is key here! Let the cream and chocolate sit undisturbed for exactly 2 minutes.
This waiting period allows the hot cream (around 180°F) to gradually melt the chocolate without any risk of scorching. You’ll notice the chocolate beginning to soften and glisten as it warms.
If you’re tempted to peek, just remember: good things come to those who wait.
After the 2-minute mark, you’ll be ready for the next essential step: stirring to create that silky-smooth ganache.
step 4. Chill Mixture Until Firm

After carefully incorporating all ingredients into your ganache mixture, proper chilling time becomes essential for achieving that perfect truffle texture.
Transfer your mixture to a shallow container and cover it with plastic wrap, ensuring the wrap touches the surface to prevent condensation.
Place your container in the refrigerator for exactly 2 hours – any less and you’ll have chocolate soup, any more and it’ll be too firm to work with!
You’ll know your mixture is ready when it’s firm enough to hold its shape but still pliable, similar to modeling clay. If you’re not sure, try pressing your finger gently into the surface – it should leave a slight indentation without sticking.
While you’re waiting, you can always organize your rolling station or daydream about the finished truffles!
step 5. Roll and Coat Truffles
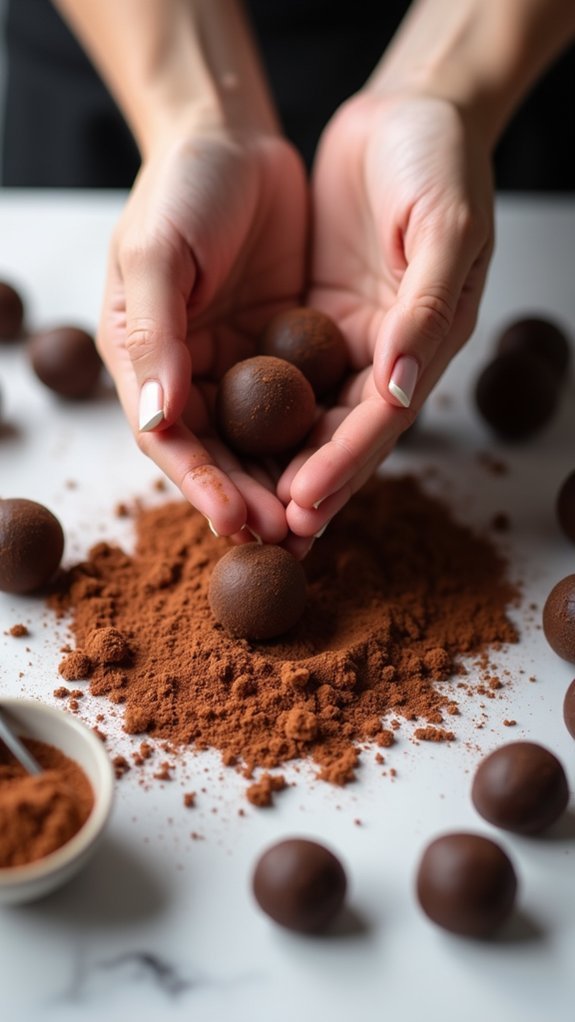
Now comes your favorite messy-but-fun part of truffle making! Using a small cookie scoop or melon baller, portion out 1-inch chunks of your chilled chocolate mixture.
With clean, slightly cool hands, quickly roll each portion into a smooth ball – don’t worry if they’re not perfect!
Place your cocoa powder in a shallow bowl. Drop each truffle ball into the powder and gently roll it around until it’s fully coated.
You’ll want to work efficiently here, as the truffles can start softening from your hands’ warmth. If they become too soft to handle, pop them back in the fridge for 15 minutes.
Once coated, place each truffle on a parchment-lined baking sheet. Give them a final dusting of cocoa powder for that professional chocolatier finish!
Final Thoughts on Chocolate Truffles
Making your own chocolate truffles proves that creating gourmet confections doesn’t require professional training or fancy equipment.
You’ll find that these homemade delights rival the expensive ones from specialty shops, and you’ll know exactly what ingredients went into them.
Remember to store your truffles in an airtight container in the refrigerator, where they’ll stay fresh for up to two weeks.
While they’re perfect for gift-giving, you might find yourself reluctant to share! For the best flavor experience, serve them at room temperature – just take them out 30 minutes before enjoying.
Don’t worry if your first batch isn’t perfectly round; even slightly misshapen truffles will taste amazing.
With practice, you’ll develop your own signature style and might even start experimenting with different coatings and flavors.